
Business Growth · UK Guide 2026
Keep Before-and-After Photographs in Accurate Context
JASOTO · Updated 5 November 2026 · 1,535 words
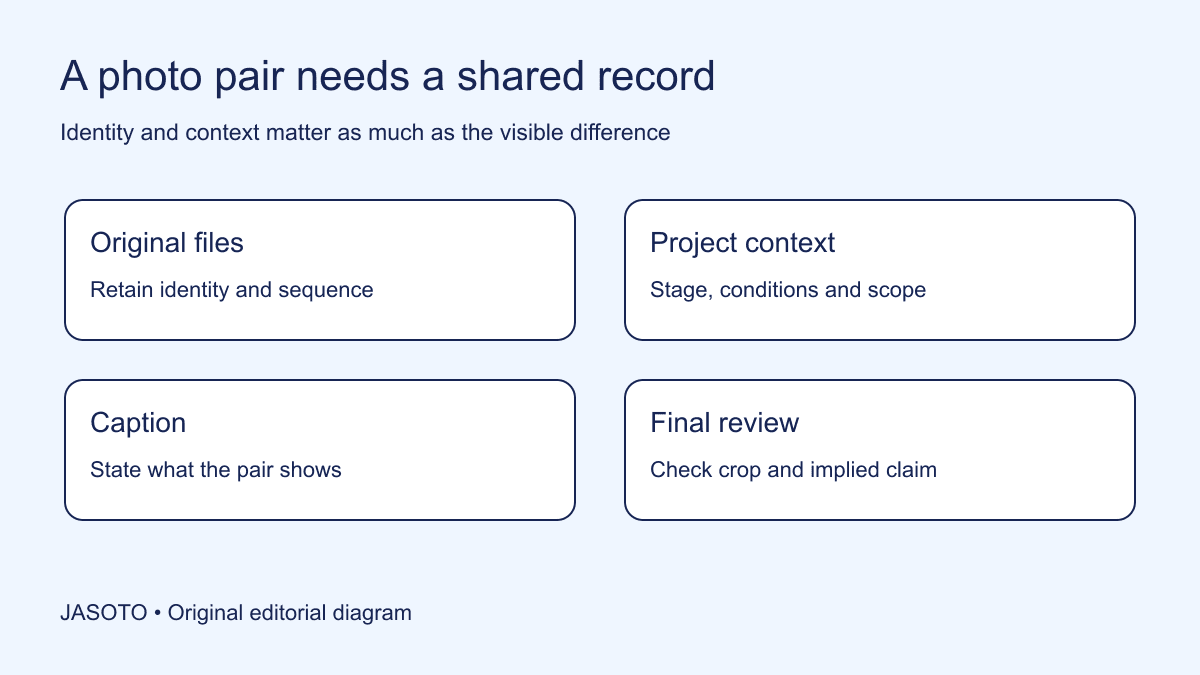
Original JASOTO editorial diagram. Its complete workflow is explained in the article; no actual customer outcome is depicted.
Keep before-and-after photographs in accurate context by verifying that both images show the same documented subject, preserving relevant capture information and explaining what changed. Review lighting, angle, crop, timing and the work's scope before pairing them. A genuine photograph can still contribute to a misleading comparison if its presentation suggests a result that the evidence does not establish.
This guide addresses ordinary project photography for a UK small business, such as completed interiors or visible service work. It is not specialist advice for medical, cosmetic or other regulated claims. Examples are fictional. Obtain appropriate professional review where the subject, rights, privacy or claims require it, and do not present illustrative images as records of actual customer work.
The practical answer
- Link both photographs to the same documented subject and project.
- Explain material differences in timing, conditions and scope.
- Keep original files and avoid edits that create a false comparison.
- Review the claim implied by the images, caption and surrounding headline.
Identify the claim before selecting the pair
Write down what the comparison is intended to show. A change in layout, a repaired visible surface and a measured performance improvement are different claims. Photographs may help demonstrate the first two, but cannot automatically prove the third. Be specific enough that a reviewer can ask whether the selected pair actually supports the statement.
Read the proposed headline and callout together with the images. “A different room layout” invites a different inference from “a room that doubles productivity.” Do not choose dramatic wording first and then expect the photographs to supply missing evidence. If the intended claim exceeds what the project record supports, narrow the story before asking a designer to make the comparison more striking.
Verify both images belong to the same subject
Link the original files to the project reference and identify the location or object they depict. Record who supplied each file and how its sequence was confirmed. Similar-looking rooms or products can be confused in a large image library, particularly when several jobs use the same materials. A file name containing “before” is not sufficient proof of identity.
Ask the project owner to resolve uncertainty before publication. If only one image can be verified, consider using that image with an accurate description instead of inventing its counterpart. Keep staged examples, stock photography and generated illustrations in separate categories. They can explain an idea when clearly labelled, but they do not become documentary evidence because they resemble the real work.
Record timing and project stage
Note when the photographs were taken and what stage they represent. A picture after a temporary tidy-up differs from a final handover image, and a photograph immediately after work differs from a later condition record. Use the date detail that matters to the claim without publishing unnecessary private information. The working record can contain more detail than the public caption.
Check whether work outside your scope occurred between the images. Another contractor may have changed lighting or furnishings, or the customer may have altered the space. Record those material changes rather than allowing the pair to imply that your business produced every difference visible. A useful comparison can show part of a larger project while making the boundary of your contribution clear.
Check angle, distance and lighting
Where practical, document the intended subject from comparable positions and under conditions that let viewers judge it fairly. Record important differences when a direct match is not possible. Do not use a wide, dim “before” image and a close, brightly lit “after” image to imply an improvement that primarily comes from the photography itself.
Consistency is a tool for honest presentation, not a claim that identical camera settings prove every outcome. Some projects change the space so substantially that the same position no longer makes sense. Explain the viewpoint and choose an appropriate format. Two separately captioned images may serve the reader better than a slider that invites a more exact comparison than the evidence can support.
Preserve originals and document meaningful edits
Keep the original files and record the versions used for publication. Note cropping, color adjustments or other edits relevant to interpretation. Ask whether an edit changes the visible evidence rather than merely making the file suitable for display. Removing a defect, changing the apparent condition or adding features can create a false account of the work.
[CAP's advice on before-and-after photographs](https://www.asa.org.uk/advice-online/before-and-after-photos.html) discusses misleading exaggeration and supporting records. Consult current guidance and appropriate advice for the specific use. The editorial method here is to preserve provenance and review the final impression. It should be possible to explain how the published image relates to the original, rather than relying on an undocumented assurance that the edit was harmless.
Keep permission and factual accuracy separate
Confirm the business is entitled to publish the images through the appropriate rights and customer-permission process. Check the proposed channels and scope of use. Permission to use an image in one context should not be casually assumed to cover every future campaign. Keep the record linked to the image so a later editor can find the applicable agreement.
Then review accuracy independently. A customer agreeing to publication does not prove that a photograph establishes a performance claim. Likewise, an accurate image is not automatically cleared for use. Treat these as separate checks with the appropriate owners. If either remains unresolved, hold the image rather than publishing it because the other check passed.
Inspect the background for unintended information
Look beyond the main subject for names, addresses, screens, documents, vehicle identifiers and other potentially sensitive detail. Follow the business's privacy and information-handling process. If a detail needs removal, consider whether a different verified image or permitted crop would preserve the comparison more honestly than a heavy alteration that obscures relevant context.
Check the final file, not just the original viewed briefly on a camera. A high-resolution upload may reveal text that was invisible in a thumbnail. Where a site visit is required to obtain suitable photographs, research project journeys and coordinate permission with the responsible contact. Do not encourage staff to gather unrelated personal detail to make the project record appear more authentic.
Write captions that define the comparison
A useful caption identifies the subject, the relevant work and the stage shown. Add a material limitation when needed. For a fictional office layout project: “The same meeting room before and after the agreed furniture reconfiguration. Lighting and wall finishes were outside this project's scope.” Use this structure only when the record supports those facts; it is not a universal caption to copy unchanged.
Avoid turning the caption into a second, stronger advertisement. “Proof of lasting performance” needs evidence beyond a visible difference at one point in time. Explain what the pair shows and leave unsupported outcomes out. If the work is an illustration or concept, label it clearly beside the image rather than relying on a general note elsewhere on the website.
Review the pair in its actual presentation
Inspect the page on the intended devices, including crop, image order and labels. Ensure “before” and “after” remain attached to the correct files. A responsive layout can reverse visual order or hide the caption that supplies essential context. Check any social preview or promotional extract that reuses the images, since the standalone version may imply something different.
Ask a reviewer unfamiliar with the project to explain what changed, who performed the work and what outcome the pair proves. Compare their answer with the verified record. If they infer more, revise the presentation rather than arguing that the full explanation is technically present somewhere below. Readers interpret the complete arrangement of images, labels and surrounding claims.
Use a comparison register for repeated publication
Create a compact record containing pair identifier, original files, project reference, permissions, approved caption and current uses. Add the reviewer and any restrictions. This helps prevent a later editor from reusing one half of a pair for an unrelated story. It also makes corrections manageable when an image appears in several places.
If image management needs support, define the task before exploring content roles or business providers. A photographer, editor and rights reviewer may handle different responsibilities. Do not assume that hiring one service automatically completes every check. The register should make those responsibilities visible while remaining proportionate to the number and significance of images the business publishes.
Correct the record when context changes
If a pairing error, unsupported caption or permission issue is discovered, identify all affected uses and correct or withdraw the material through the normal publishing process. Keep the original record and explain the correction internally. Do not silently replace a disputed image with another dramatic example while retaining the same unsupported outcome claim.
Review continuing claims when the service or project context changes. A photograph remains evidence of what it depicts at its recorded point, rather than a guarantee about every future job. Accurate before-and-after material helps readers understand real work when identity, scope and limits remain visible. Stronger business or performance outcomes require their own evidence and should be assessed independently of how impressive the images look.
Put the guide into practice
- Verify the identity and sequence of both images.
- Record relevant capture conditions and project stage.
- Check permissions and visible private information.
- Write a caption that describes scope and limits.
- Inspect the final crop, labels and implied claim.
Frequently asked questions
Can different lighting make a genuine comparison misleading?
It can change how viewers interpret the difference. Record important capture conditions and avoid presenting a lighting effect as evidence of the work's performance. Where the images are not visually comparable, explain the limitation or choose a different presentation rather than forcing them into a dramatic pair.
Is it acceptable to use a stock photograph as the before image?
Do not present it as the earlier condition of an actual project. If an illustrative comparison is genuinely useful, label the images and purpose clearly so viewers understand they are examples. An invented ‘before’ image paired with real work can imply a transformation that did not occur.
Does the customer's approval prove every claim the images imply?
No. Approval can support permission and agreement about the particular material, but objective performance claims still need appropriate evidence. A customer agreeing that a room looks different does not establish durability, energy savings or a typical result for other customers. Review those claims separately.
Explore JASOTO tools
Continue with JASOTO
Compare your next step
Discover UK businesses, compare services and request written quotes before making a decision.